Estimated reading time: 11 minutes
This article will explain the purpose and use of attribute templates, as well as how to manage them in Miva 10.
Product attributes allow you to offer customizations for your shoppers, without having to create a different product for every possible combination. This means you get to keep your product catalog succinct and orderly, providing a much more pleasant shopping experience for your customers.
Because attributes can be customized to cover an endless array of options, they can get pretty complicated. Luckily, Miva gives you the ability to create attribute templates that can be quickly applied to large amounts of products with the click of a button. And they work the same way in Miva 10 as they did in Miva 9.
Building Your Miva 10 Attribute Template
You’ve got a ton of versatility with your attributes, which will allow them to fit neatly into your existing workflow. Chances are, you already have some attributes set up on some of your products. You may even have some templates already in use. But if you don’t, or if you want to understand how to set them up yourself, this guide will help.
Getting To Your Attributes
To start, to access and create attribute templates in Miva 10, visit your Catalog screen, and select the Attribute Templates tab.

From this screen, you can create and edit attribute templates. You can also assign and remove them from products, delete them, and export them.
Click the blue Add Attribute Template to get started!
Template Code and Prompt
Upon creating a new template, you’ll be required to fill in a prompt and code. Just as with the attribute options themselves (which you’ll see soon), the Code is what you see in a submitted order, and the Prompt is what the shopper sees on the front end of the site.
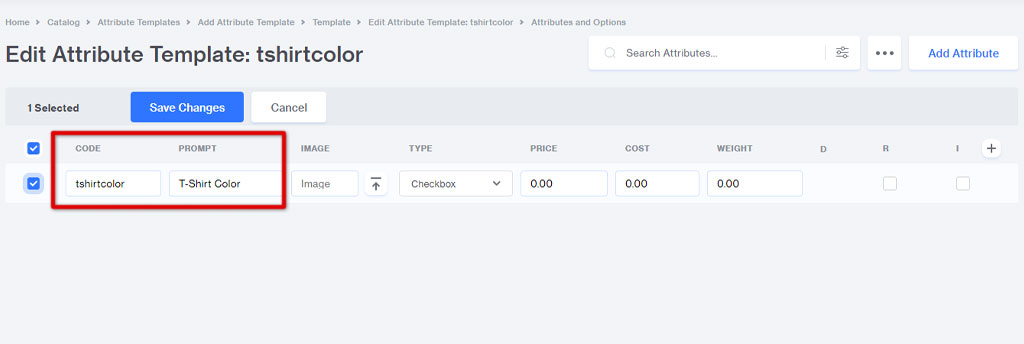
The code and prompt work similarly to product codes and names. In this example, I’ve used the following:
- Code: tshirtcolor
- Prompt: T-Shirt Color

Make sure your codes and prompts are descriptive and unique, then click the blue Add button.
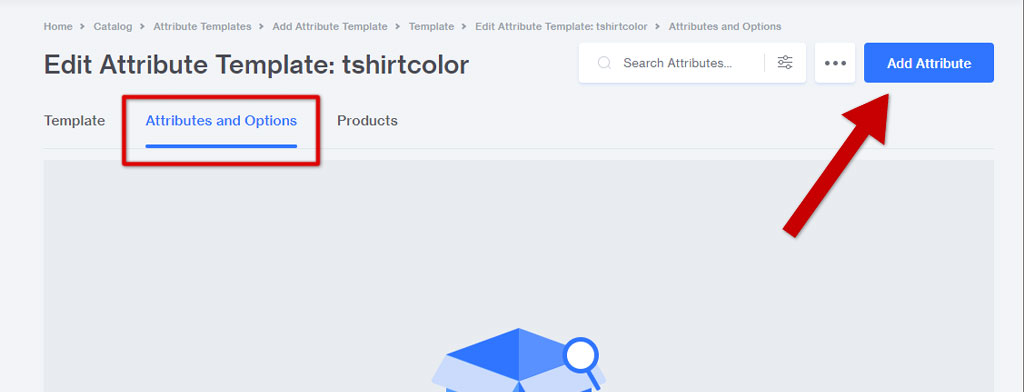
Adding Attributes and Options
Now that your base template is created, it’s time to add your attributes and options – the meat and potatoes of your template. Select the Attributes and Options tab, then click the blue Add Attribute button.
Code and Prompt
Just as before, fill in a descriptive and clear code and prompt for your attribute.
Image
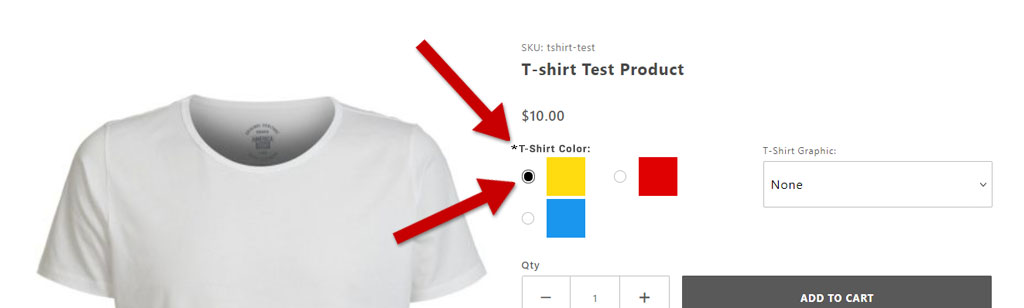
Some attribute types will allow you to display an image, like a swatch for example. If you want to show color swatches, click the Upload button under the Image header.
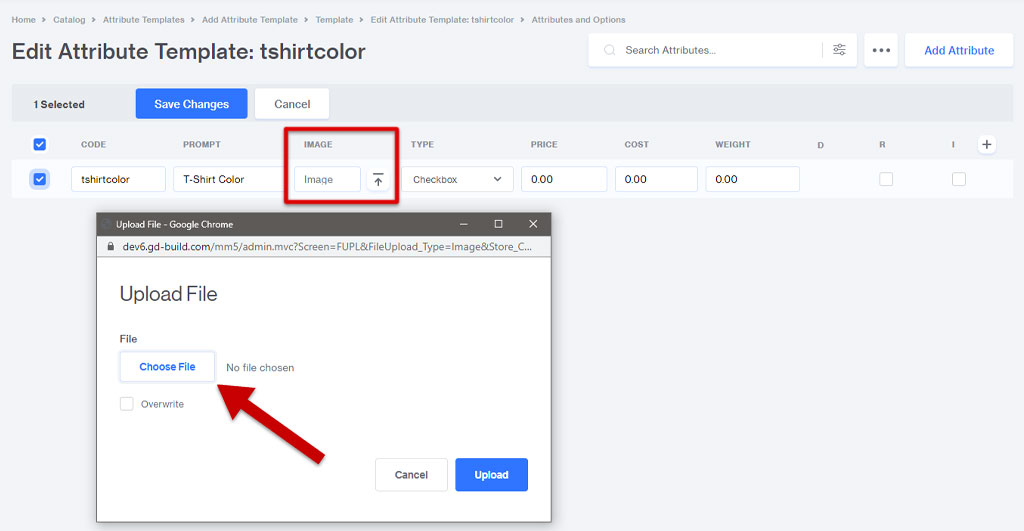
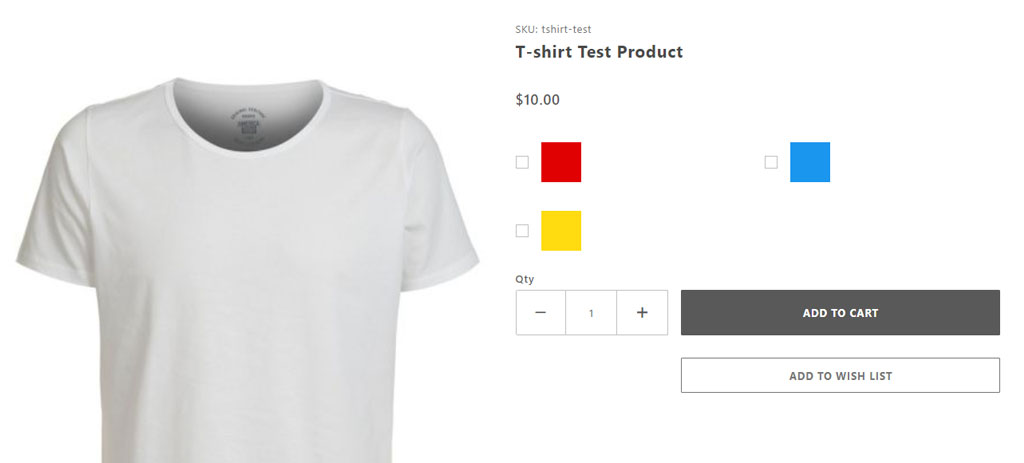
Upload your image swatch. Here’s what it will look like if you use the image option with checkboxes.
Type
Changing the attribute types will significantly change the way the attribute works. Depending on the option you’re offering, certain attribute types may not be appropriate for your needs.
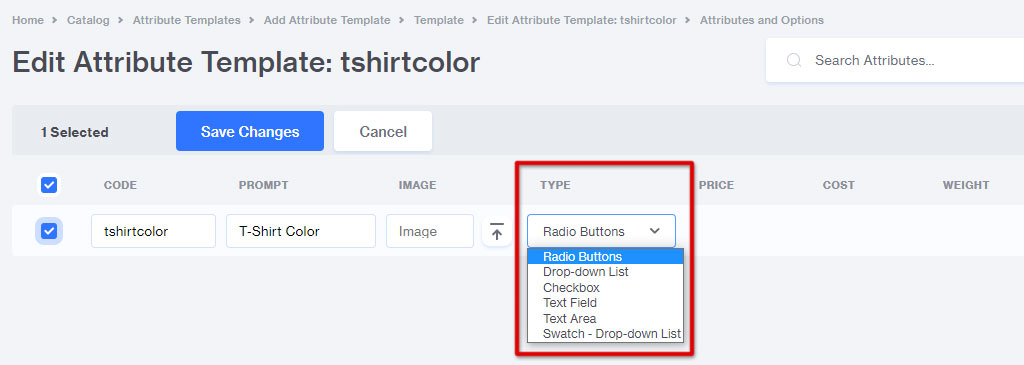
- Radio Buttons. Set up a title attribute (ie. Color) and provide options (ie. Red, Blue, Yellow). It will allow shoppers to select one option only.
- Drop Down List. More compact than radio buttons, you set up a title attribute (ie. Color) and provide a list of options (ie. Red, Yellow, Blue). The options are hidden in a drop-down list instead of displayed like Radio Buttons. It will allow shoppers to select one option only.
- Checkbox. This type doesn’t use options. If you use multiple checkbox attributes on one product, they need to be combinable. For example, you shouldn’t use this option for color, because you can’t have your t-shirt red and blue. Instead, you might have one for “Add matching hat” and another for “Gift wrap my item”.
- Text Field. Use a text field for a small amount of text, like a single line. Our developers have created a feature that lets you set character limits on your text fields!
- Text Area. This is better for a larger amount of text. Customers can more easily see the text they enter if it’s in paragraph format.
- Swatch – Drop Down List. Similar to the regular drop down list, this option lets you add images for swatches to show color, texture options, fonts, etc. It will allow shoppers to select one option only.
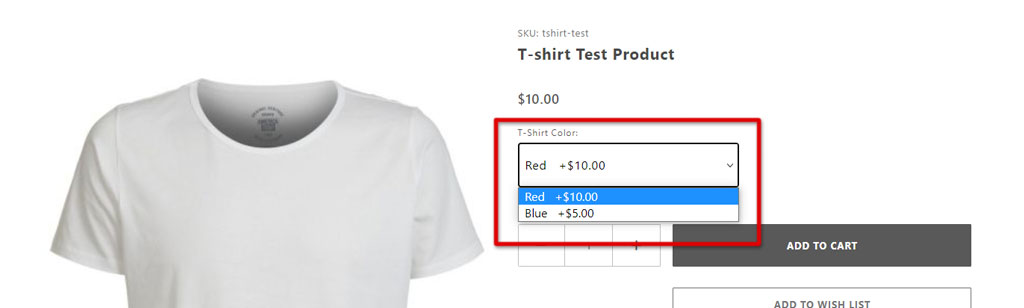
Price and Cost
These fields allow you to add charges to attributes. If you want to apply an up-charge to optional attributes, you can enter those numbers here.
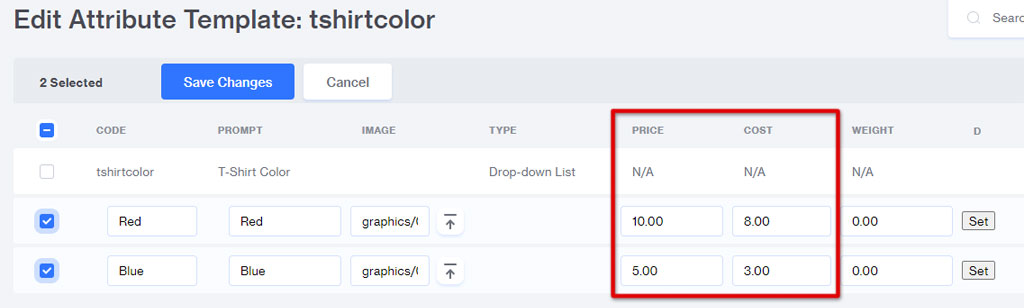
Depending on the attribute type you’re using, the price may be applied to either the title attribute, or the option. The numbers you enter in the Price field will display as additions on the product page.
Weight
You may not need to add a value to the Weight field in your attributes. If the option simply changes the color, there won’t be a difference in weight. If your option allows the shopper to add gold plating to their t-shirt (hey, you can find anything online these days!), it will add a few pounds to your shipping weight.
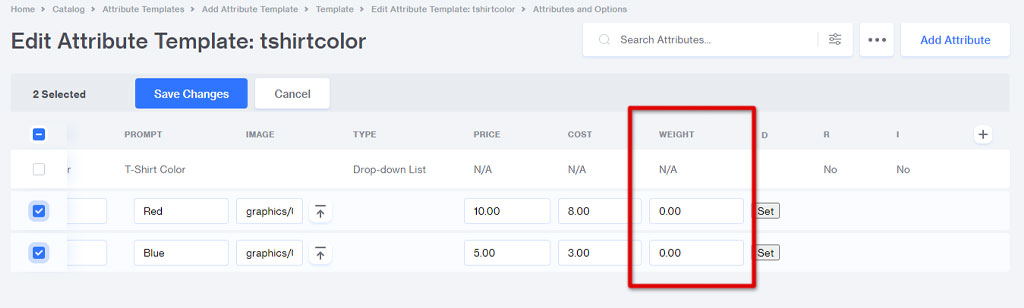
The value in the weight field won’t show on the product page, but if selected, will add to the shipping weight you enter on the main product page.
D, R, and I
No, that’s not a typo or special code. Those D, R, and I fields on attributes control three different options:
- Default. Available when you use an attribute type that has options (like Radio Buttons or a Drop Down List). You can set one of your options to be the default. This is an optional field and doesn’t need to be set. If you do, that attribute option will be pre-selected on the product page.
- Required. Just the way it sounds, checking this box makes the attribute required. The customer won’t be able to add the item to their cart without making a selection. Depending on how your store is set up, a required attribute might show up bolded, with a star, in a different color, etc.
- Inventory. Checking the inventory box allows you to track the stock of your items. If you have this box checked and don’t add stock to your admin, shoppers won’t be able to purchase the product. Working with developers to change your store settings and code can change whether your available stock shows on the product page, how the pricing shows in the category screen, and more.
Assigning Attribute Templates in Miva 10
You can make your attribute template as complicated or as simple as you’d like. If you offer custom products, you can create a template that offers options for size, color, graphic design, custom text, add-on products and more. Or perhaps you just want all the t-shirts on your site to have the same sizing options.
Once you’ve created your template, you can start assigning it to items. Click on the Products tab. From here, you can change the views and use the search to find the items you need. If you only want to apply the template to products in your T-Shirt category, do an advanced search for items in that category.
Use the Filter menu to choose whether you want to view items that are assigned, that are not assigned, or all.
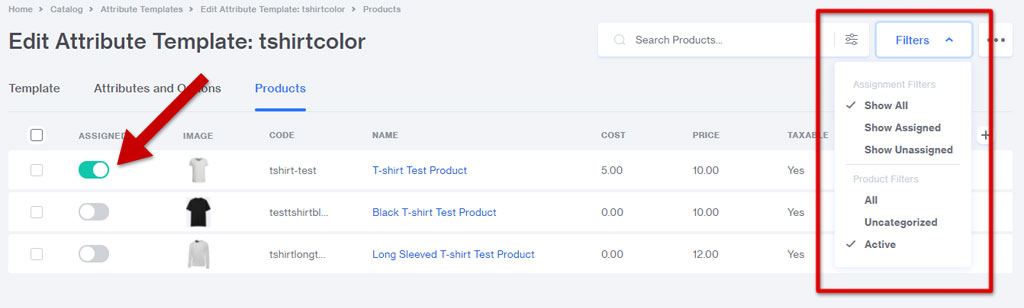
Use the Assign toggle switch to add items to the template. Once you apply the template, it will immediately show on the product page on your live site, and you’ll also be able to access it from within the Edit Product page in your admin.
Attribute Templates From the Product Page
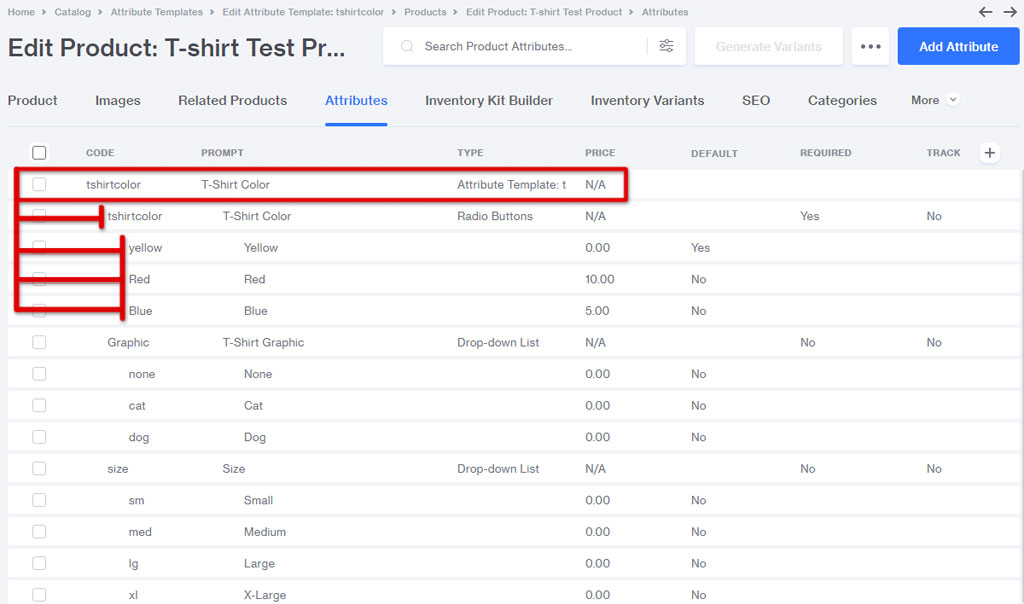
When you view the Attributes tab of your product page, you will find your attribute template in place. Note the template name. Also, note that your attribute options are indented in from your attribute titles.
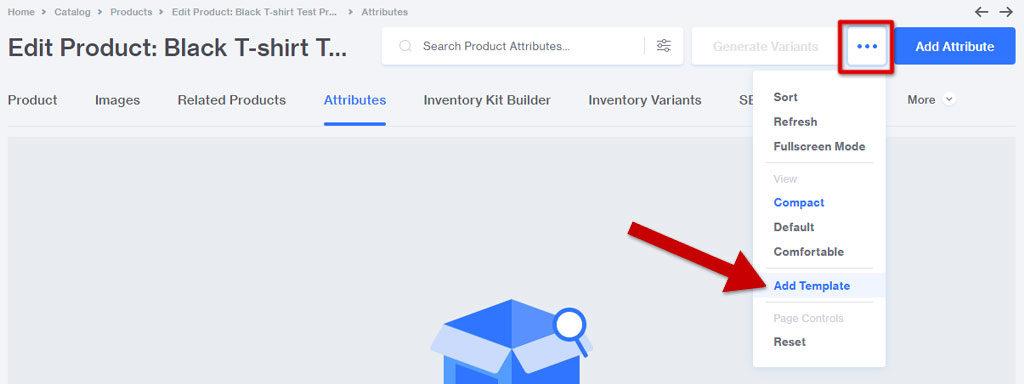
Adding a Template From the Product Page
If you add a new product to your store and want to apply an existing attribute template, you can do so from the Attributes tab on the product page. From that page, click the Ellipsis button and select Add Template.
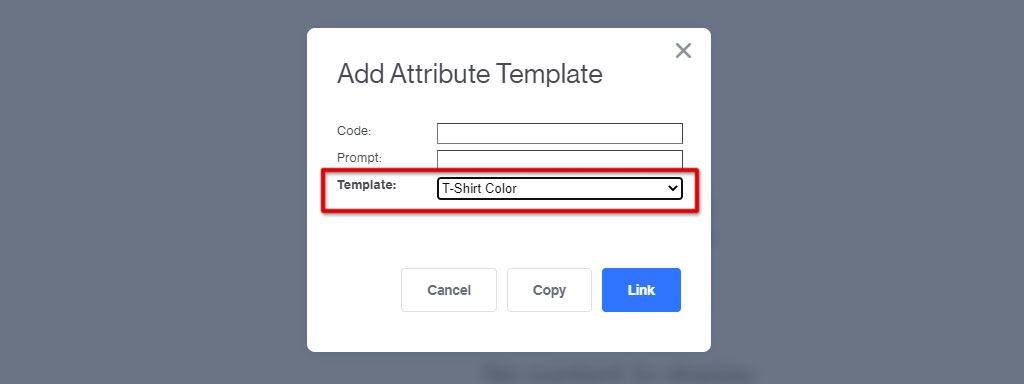
Select your template from the drop down list. You’ll notice you have two options of adding the template as a Copy or as a Link.
Copy
Adding a template as a copy will duplicate the template and add it to the product, separate from any other product using that template. This means you can make changes to it for this particular product, without it affecting any other product that uses the same template.
This might be necessary if, for example, you offer most products in 6 sizes, but only a couple available in 5 sizes. You can add the template as a copy, and remove the extra size from that product.
The other side of that coin, however, means that if you decide you want to add a new graphic design option to all products, any templates added as a copy will need to be independently updated.
Link
Opposite of Copy, adding the template as a link keeps it connected to all other products using the same one. This allows you to quickly and easily update all products at once, simply by changing the original template. If your supplier adds a new design, you can add that to your entire catalog with just a few clicks.
If you add a template as a Link, then decide at a later date you want to make a change to just that product, you can convert the template into a Copy. From that point on, the template on that product will no longer be linked to the others. You cannot reverse this, short of deleting the attributes and re-adding the original template.

You can also edit the entire linked template from the product page. Doing so will update all other products.
Attribute Templates in Miva 10
The way the templates work hasn’t changed between Miva versions 9 and 10, besides the look of the buttons and interface. If you aren’t already using templates and think they might be beneficial for your product line, this guide should give you everything you need to get started.
If you’d rather have us do the work of creating your templates (it can be a tedious process, and we have people for that) let us know!