Estimated reading time: 10 minutes
Gift certificates have always been a fan favorite when it comes to gift-giving. They are general enough for “thank-yous” to people you don’t know very well (ie. a coworker or teacher). They are also personal enough to show you know where your friend, family member, or acquaintance likes to shop. And they are the perfect way to give a gift to that person who is hard to shop for; no need to exchange a gift when they pick it out themselves!
With commerce shifting from brick-and-mortar stores to online shopping, the gift certificate has remained a favorite. But it can be pesky to set up in such a way that doesn’t unduly charge your customer extra fees, like shipping. We’ve provided a step-by-step tutorial to get your gift certificate up and running in your Miva store without your customer being charged for shipping.
Jump to Section:
STEP ONE: Create your Gift Certificate base product
- Log into your Miva admin.
- In your Catalog, click to create a New Product.
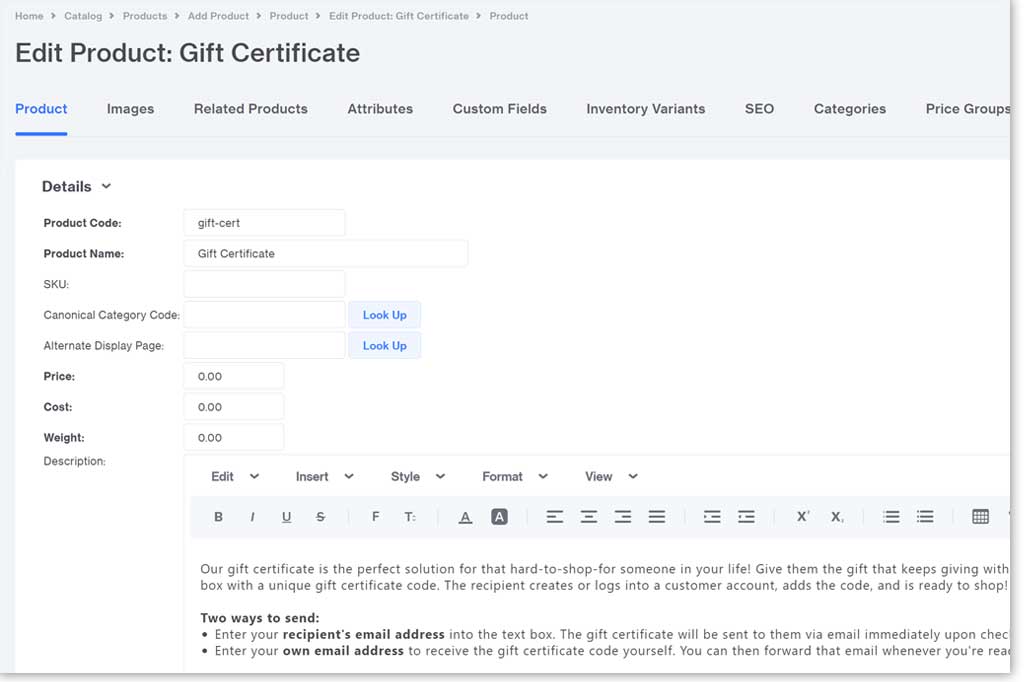
- Add you product details:
- Insert a Product Code (ie. gift-cert)
- Insert a Product Name (ie. Gift Certificate)
- Leave the Price and Cost set to $0
- Leave the Weight at 0
- Add a Description. Miva’s gift certificates operate a little differently from other sites, so we recommend something like the following, to properly explain how they work.
| Our gift certificate is the perfect solution for that hard-to-shop-for someone in your life! Give them the gift that keeps giving with a digital gift certificate. Once purchased, an email will be sent to the address entered in the text box with a unique gift certificate code. The recipient creates or logs into a customer account, adds the code, and is ready to shop! The balance stays online on their account; no more lost or damaged gift cards! Two ways to send: – Enter your recipient’s email address into the text box. The gift certificate will be sent to them via email immediately upon checking out. – Enter your own email address to receive the gift certificate code yourself. You can then forward that email whenever you’re ready! |
Your product should look something like this:
- Uncheck the Taxable checkbox, as gift certificates should not have tax applied at the time of purchase.
- Click the blue Add Product button to save your changes.
STEP TWO: Create your Gift Certificate variants
Creating your gift certificates with variants will allow the price and image to update dynamically as your shoppers select different amounts. In this case, your variants will be the different gift certificate values you wish to sell.
Set up the option to choose a dollar amount:
- Click to the Attributes tab.
- Click the blue Add Attribute button.
- Fill out the attribute details:
- Add a Code (ie. amount)
- Add a Prompt. Keep in mind, this is what the shopper will see (ie. Gift Certificate Amount).
- Select Dropdown List from the Type menu.
- Click the checkboxes for both Required and Track Inventory.
- Click the blue Save Changes button.
Set up the amounts:
- Fill out the attribute options:
- Add a Code which should reflect the amount.
- Add a Prompt. Again, this is what the shopper will see, so format it appropriately (ie. $10.00).
- Leave the rest of the options blank and press enter on your keyboard to move onto the next amount. Continue on with the rest of your amounts.
- For the price attribute ONLY, check the Track Inventory button. That will allow you to generate the variants in the follow steps.
Your attributes should look like this:

Add additional attributes:
If you want your shoppers to be able to send the gift certificate directly to their recipients with a gift message, you will need to include these attributes.
- Create an attribute set to Text Field type for the recipient’s email address.
- Enter a Code and Prompt.
- We typically make this field required by clicking the Required checkbox.

- Create an attribute set to Text Area type for the gift message.
- Enter a Code and Prompt.
- We typically leave this field as optional.

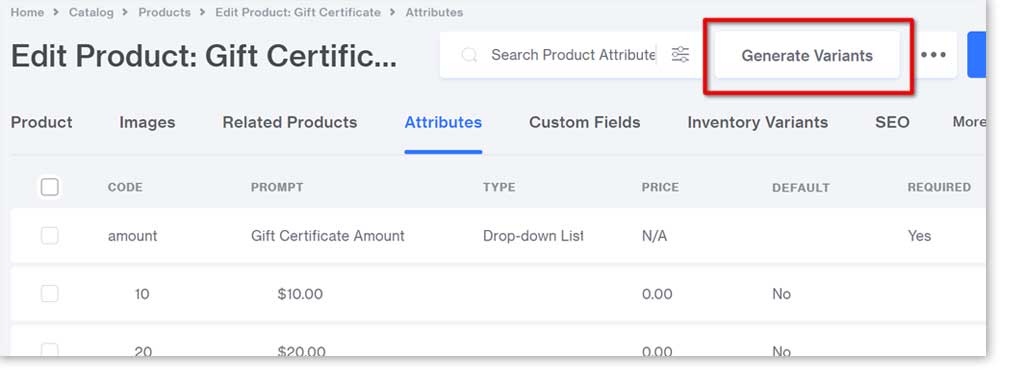
Generate your variants:
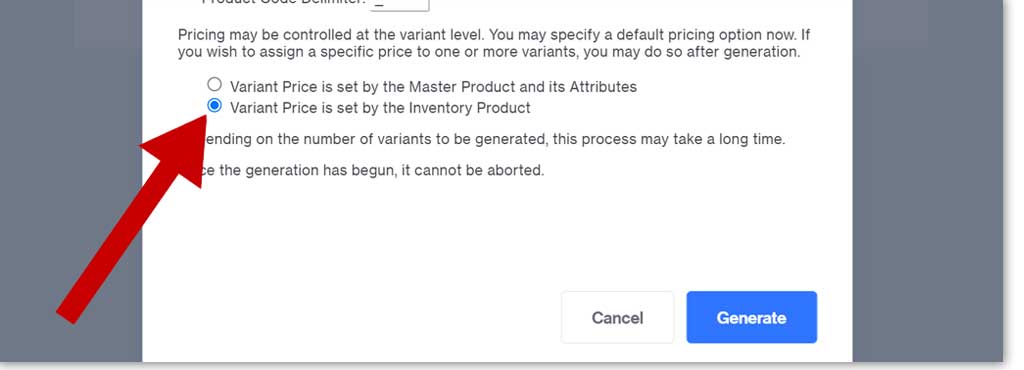
- Click the Generate Variants button in the upper right corner. A new window will open.
- Select the second bullet point: Variant Price is set by the Inventory Product.
- Click the blue Generate button.
Update your variants:
Now that your variants have been created, you need to edit them so they behave properly. Beginning with the base product:
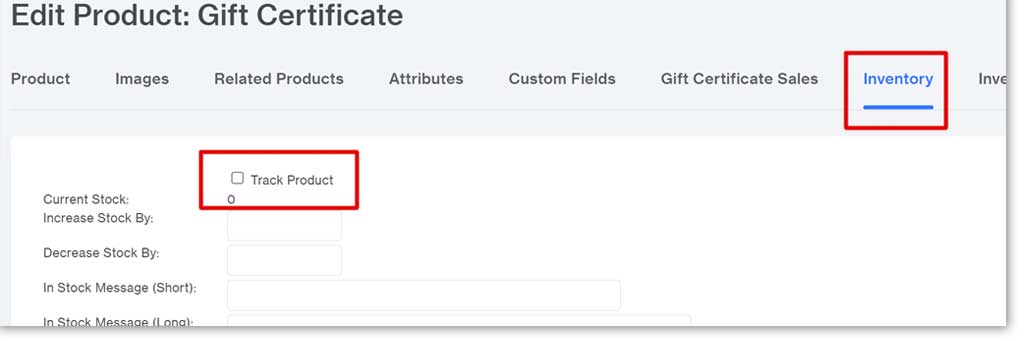
- If your store has Inventory Tracking set up, you’ll need to take this step:
- Click the Inventory tab.
- Uncheck the Track Product checkbox and click the blue Update button.
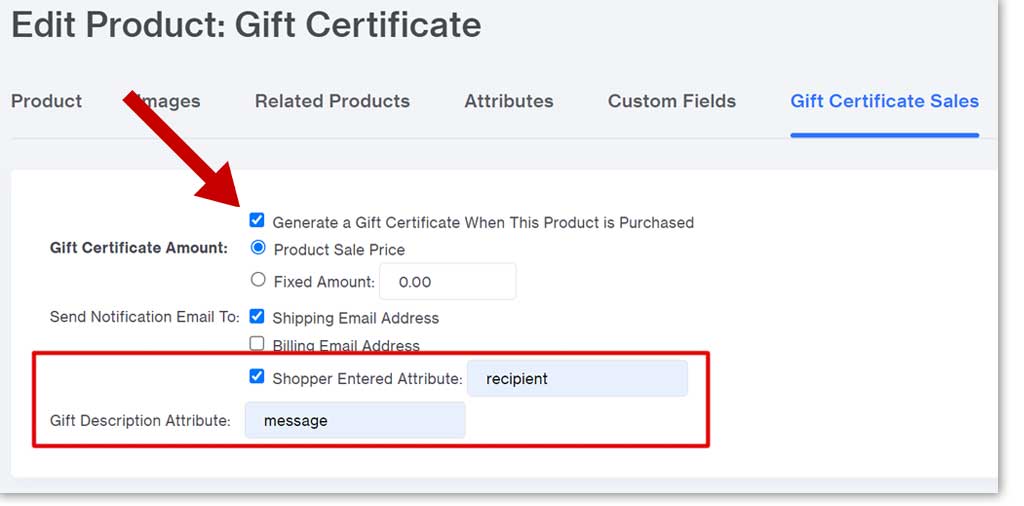
- Click on the Gift Certificate Sales tab. It is likely hidden in the “More” menu.
- Make the following changes:
- Click the checkbox to Generate a Gift Certificate When This Product is Purchased.
- Click the checkbox beside Shopper Entered Attribute.
- Enter the Codes you used for the Recipient email and Gift message attributes. Miva will search for and pull that information for the order, so ensure you’ve entered the code correctly.
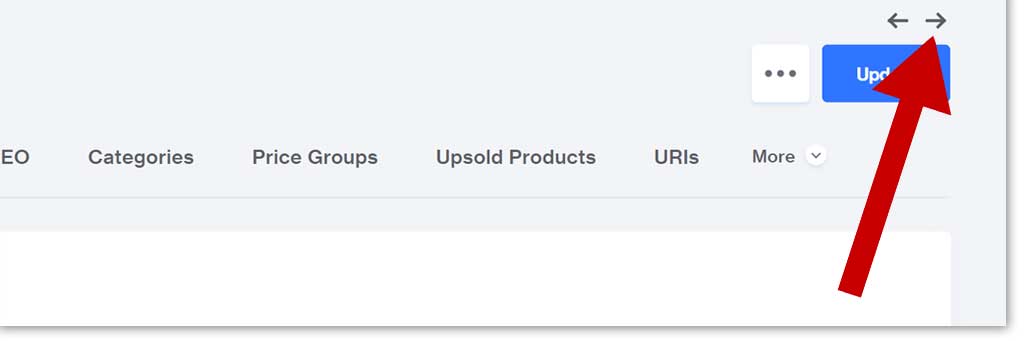
- Proceed to your first variant by clicking the right arrow. This will take you to the next created product, which should be your first variant. Confirm that it’s correct by looking at the product title.
- Add the appropriate value to the Price field (ie. In this case it would be 10).
- Uncheck the Taxable check box.
- Leave all other fields as they are.

- Click the Update button in the upper right corner.
- Repeat these steps until you’ve finished all your new variants.
At this point, your product is complete. All that’s left is to set up your free shipping option.
STEP THREE: Set Up Free Gift Certificate Shipping
Now that your product is complete, you’ll need to access your Shipping Settings to create a new digital delivery shipping method. After that has been created, we’ll apply it to your gift certificate.
- Click on the Settings menu in the lower left corner.
- Select Shipping Settings.
- If you have a tab called Flat Rate Shipping, you can skip the next step.
Install Flat Rate Shipping:
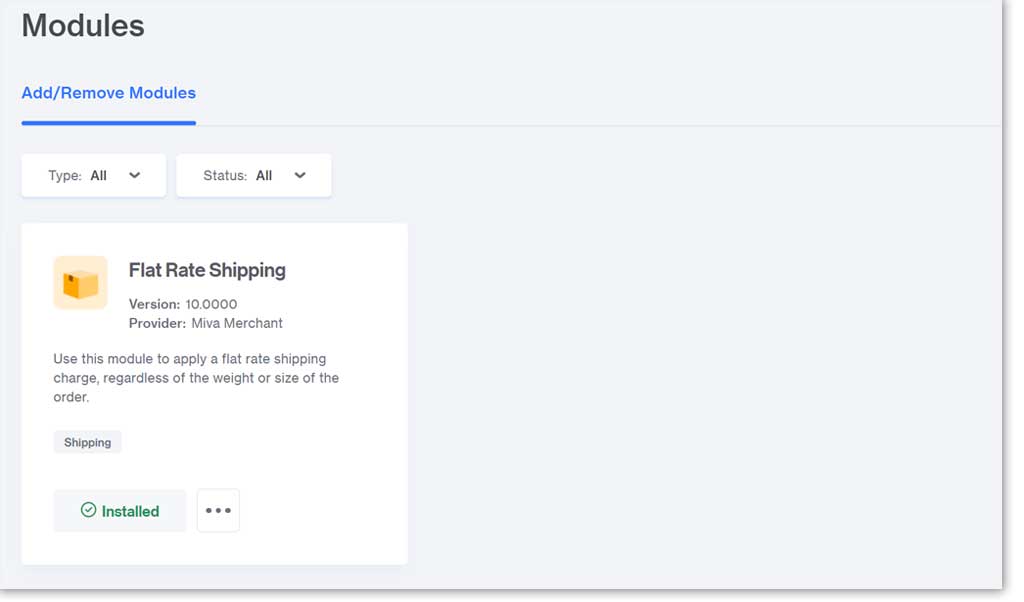
If you don’t have a Flat Rate Shipping tab:
- Click on the Settings menu in the lower left corner.
- Select Modules.
- Search or scroll to find Flat Rate Shipping.
- Click the Install button.
Create your shipping method:
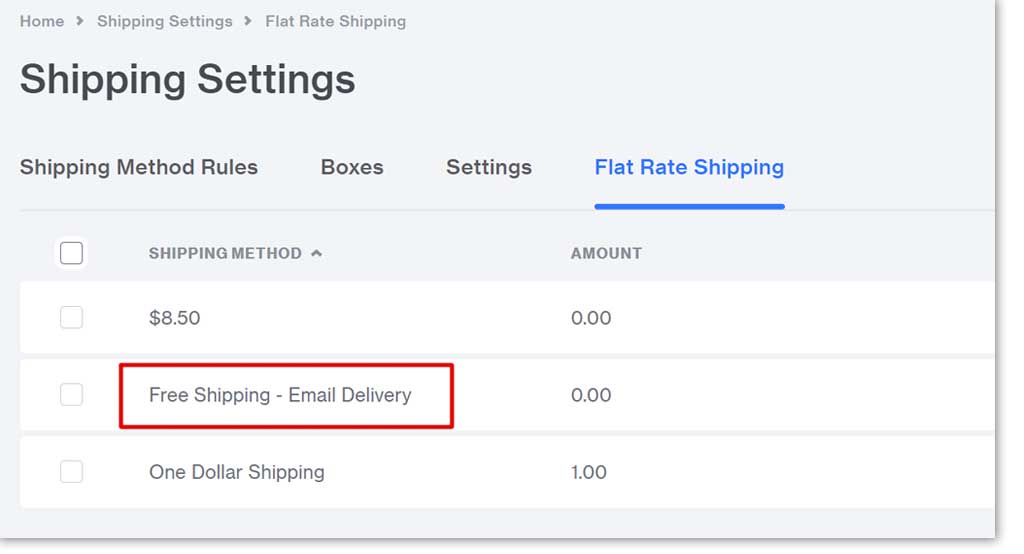
- From the Shipping Settings page, click the Flat Rate Shipping tab.
- Click the blue Add Shipping Method button.
- Fill in a name that makes sense and will work for any digital delivery items that you might offer (ie. digital templates, manuals, etc.). We used “Free Shipping – Email Delivery” so shoppers know exactly what the shipping method involves.
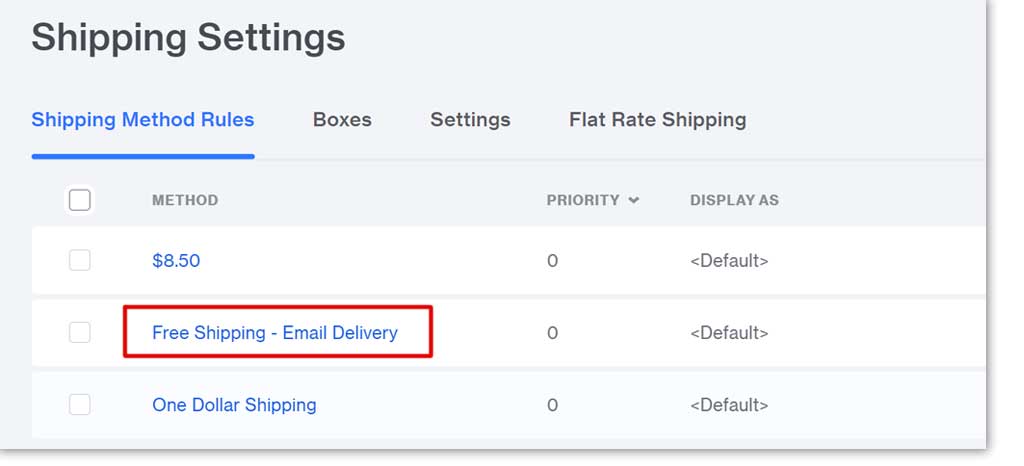
- Click back over to the Shipping Method Rules tab.
- Search or scroll to find your new method.
- Click the blue Method link. A window will open.
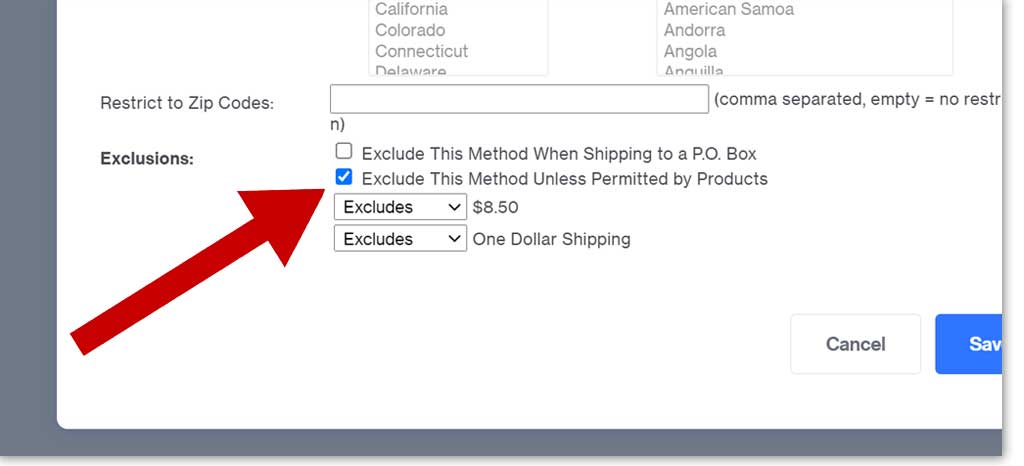
- You can leave all settings as they are except the two following:
- Click the checkbox next to Exclude This Method Unless Permitted by Products.
- Change the Exclusions next to your other shipping methods to Excludes.
Permit your gift certificate to use this shipping method:
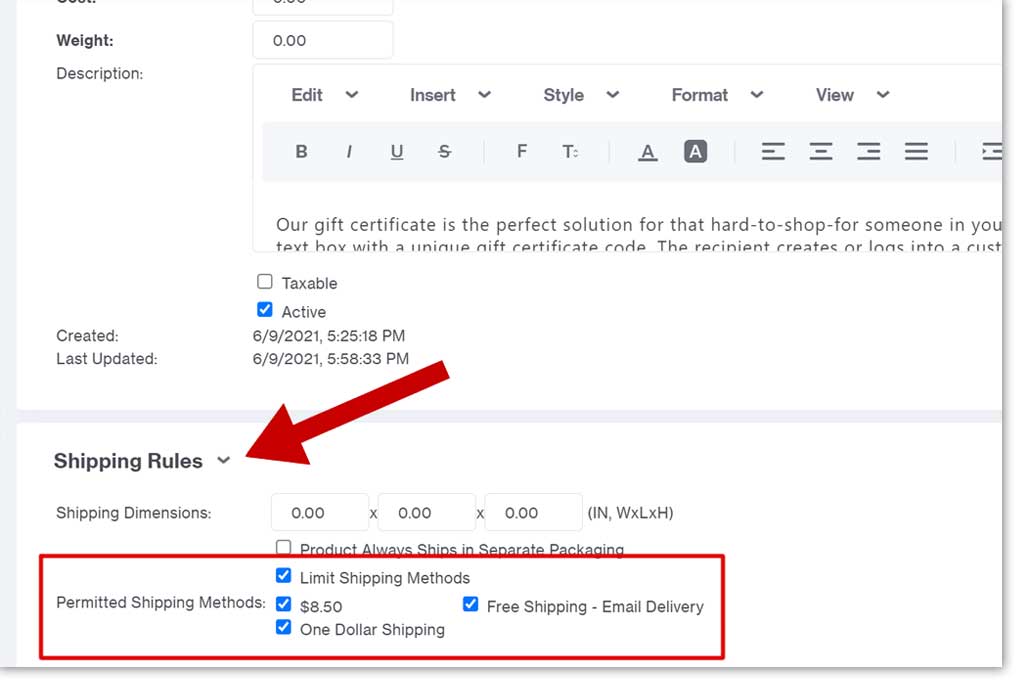
Now that you have your product created, and your shipping method created, you need to connect the two. To do this, go back to your main gift certificate product by searching for it in your catalog.
- On the Edit Product page, scroll down to the Shipping Rules section.
- Select the checkbox for Limit Shipping Methods.
- Select the checkboxes for all other shipping methods.
- Click the blue Update button in the upper right corner.
- Click the right arrow to move to the next product, which should be your first variant.
- Repeat this process for each of your variants.
This collection of settings will ensure a few things:
- Shoppers purchasing just a gift certificate will get free shipping.
- Shoppers purchasing just a gift certificate won’t have the option to select any other methods accidentally (helping to reduce errors and refunds).
- Shoppers purchasing a gift certificate and other items will have only regular shipping options available without extra costs due to the gift certificate.
- Shoppers purchasing only other items won’t see the Email Delivery option.
And you’re done! It’s a lot of steps but not a very intensive process and nothing will go too wrong if you make a mistake somewhere along the line. It’s also easy to test along the way to make sure things are working. Just open your site and attempt to purchase the item. Don’t miss out on the $160 billion gift card/certificate industry this gift-giving season and give this method a try. If you run into trouble or decide you’d rather not go through the steps to set this up yourself, contact us for help.